Best Way to Upload Photos to Mac
Want to see your vacation photos on your computer, but stuck with them on your telephone looking for a solution on how to import photos from iPhone to Mac? You'd exist surprised how many ways you lot can use to transfer your images effortlessly.
Before we start
Storing photos on a Mac is commonly more convenient as it just has more infinite for them. Withal, when transferring images from iPhone to Mac you lot may accidentally import a lot of duplicates. Get MacKeeper to delete all the duplicates for you in three unproblematic step
- Download and install MacKeeper
- Go to the Duplicates Finder tool
- Ran scan and remove similar photos detected
Plus you go to protect your Mac from malware and viruses, which tin compromise your data as MacKeeper equips your Mac with cleaning and anti-malware tools.
Allow's cut to the hunt and delve deeper into the question of how to transfer photos from an iPhone to a Mac.
This article covers how to delete duplicate photos on your Mac via:
- Photos app
- Epitome Capture
- AirDrop
- iCloud Photos
- iCloud Files
- iMessages
- Photo Stream
Transfer photos from iPhone to Maс via Photos
You can transfer a photo from your iPhone to a Mac past using iTunes/Photos and a cable. This is a reliable way if you don't accept access to the internet or your connection speed is too low.
How to motility photos from an iPhone to a Mac with Photos:
- Connect your iPhone to Mac using a USB cable
- Open the Photos app on your Mac
- In the upper menu of the Photos app, choose Import
- Click Import all new photos or select the photos yous demand and click Import Selected
- You will receive a notification one time the transfer process is completed
Note: If your photos won't import from iPhone to Mac, you should note that iPhones use HEIF/HEVC image formats to increase quality. During the transfer to a computer, HEIF/HEVC are converted to a compatible format. This results in disruptions during the copying procedure of large files.
To avert this problem with large files, get to Settings > Photos > Transfer to Mac. Make certain that Keep Originals is checked so that the files are not reformatted during transfer.

Download photos from iPhone to a Mac via Prototype Capture
Image Capture is a utility that comes by default on macOS. It'southward useful when you need to access photos, but your Mac does not recognize the device you're trying to connect. Don't forget y'all'll need a cable for this ane.
How to use Prototype Capture to transfer photos:
- Connect your iPhone to your MacBook with a cable
- Permit access to the device and enter the countersign
- Open Spotlight by pressing Command + Space > type Image Capture
- Nether the Devices heading, find and select your iPhone
- Unlock your iPhone to grant access
- You lot can cull which way to view the images in the lesser left corner — choose from lines or blocks
- Select the location where you want the pictures imported at the bottom of the Image Capture window
- Click on Import All if you're going to transfer all images or select the desired files and click Import

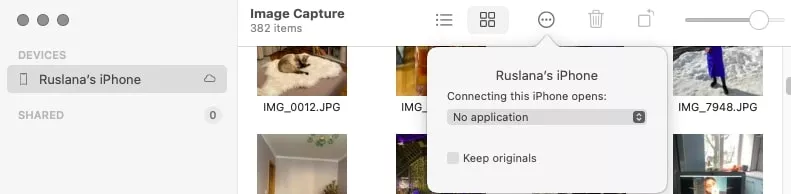
You can set the app to automatically copy images from your iPhone to your Mac when yous connect them. To practice that, get-go, you need to click on the square symbol in the bottom left corner of the window to open up a menu. Under Connecting this camera opens, select the Epitome Capture app. And so select the box next to Delete subsequently import to wipe the photos when they've been moved to your Mac. For macOS Big Sur wait for a circumvolve with the three dots icon and tick/untick Keep originals.
Motility photos from iPhone to Mac via AirDrop
What practise you lot do if you need to urgently forrad a photo and don't have fourth dimension to set up up user accounts?
You can transfer pictures from iPhone to Mac via AirDrop to send a file to a Mac, iPhone, or iPad user within seconds. The only status is for them to use the aforementioned Wi-Fi network as you and be within the Bluetooth range.
To use AirDrop for photo transfer:
i. Open up the Photos app and select the pictures that yous wish to transport
2. Click the Share button and select AirDrop from the carte du jour that appears

3. The app volition find and brandish all Apple users in close vicinity
four. Tap the device that yous need to transport the moving-picture show to and click Done
five. If you tin't see the required person in the contact list, check that the accepting device is marked as discoverable by everyone

The transferred files will be stored in the "Downloads" folder on Mac.
Note: If yous're sending a Live Photograph to a MacBook, yous'll exist able to play information technology if you're running macOS X El Capitan or newer. Older versions of macOS don't support Alive Photos.
Upload photos from iPhone to Mac via iCloud Photos
iCloud is one of the fastest ways to synchronize your photos without connecting your devices with a cable. The primary benefits of Apple's cloud storage are the easy-to-navigate interface and file sorting. This makes navigating the storage significantly easier.
To brainstorm synchronizing your photos with iCloud:
ane. Sign in to iCloud with your Apple ID and password. Make sure to sign in on all devices that you desire to sync
2. Brand sure that all of the devices are up to date with the latest firmware — synchronization might be affected if one device'due south software is too former
3. Ensure Wi-Fi connection on all devices
4. On your iPhone, iPad, or iPod touch on, go to Settings > Your Apple ID > iCloud > Photos
5. Move the slider side by side to iCloud Photos to the right to activate synchronization with the iOS device

6. On your Mac, become to the Apple menu on top of the screen and select Organisation Preferences
seven. Become to iCloud or Apple ID for macOS Catalina or after > choose iCloud
8. For versions prior to macOS Catalina Check the box next to iCloud Photos
nine. If you lot run macOS Catalina and later. and and so click on Options next to information technology

If y'all have transferred files with iTunes before attempting the iCloud transfer, yous're going to see a warning that photograph and video files synchronized with iTunes will be deleted. Photos and videos synced with your Mac will stay on the computer but will be cleared from the iOS device. To admission the media files from your iPhone, plow on iCloud Photos on your Mac — this will automatically upload all the images to the server.
Transfer photos via iCloud Files
iCloud Bulldoze is an incredibly useful utility that allows you to expand your storage capacity way beyond your MacBook's or iPhone's RAM and synchronize all of your Apple devices. It provides 50GB of memory infinite for free and expands it upwardly to 2GB for a reasonable price. You tin create a backup of your photo and video files with iCloud Files.
To use iCloud Drive to transfer your photos to a Mac:
- Make sure all of your devices are updated
- Sign in to iCloud with your Apple tree ID and password on both your iPhone and your Mac
- Connect to the internet
- On an iPhone, become to Settings > Your Apple ID > iCloud. Scroll downwardly and swipe right on iCloud drive
- On a Mac, go to the Apple tree bill of fare > System Preferences > iCloud/Apple ID tab. Check the box next to the iCloud Drive section and click on Options. Cheque the boxes next to anything that you desire to exist stored on your iCloud — this might be your Desktop and Documents folders

vi. At present, you'll be able to access whatsoever files stored on iCloud drive from whatever of your Apple devices. On a Mac, you tin can simply open Finder and go to the iCloud Drive folder.
Send photos via email or iMessages
You lot can use your email or Apple's own iMessage to transfer photos from your iPhone to your Mac. Like most other ways, this one has both pros and cons.
The size and number of pictures you can attach to ane email are limited, making information technology less user-friendly to send photos this way. Nevertheless, information technology can human action as a concluding resort if something happens to your computer — you tin can e'er restore your photos by downloading them from emails on whatever device that can open your mail.
To send pictures by email:
- Become to the photo gallery on your iPhone and select all the images and videos that you wish to forrard
- Click on the Share icon in the bottom left corner of the screen
- Select e-mail from the menu that appears. Make certain that you're logged in to your mail account
- Ship the email

Using Photo Stream
The Photo Stream role synchronizes the most recent yard pictures between your iPhone, iPad, iPod touch, Mac, and Apple tree Television set. All media files except for videos and Alive Photos are automatically uploaded to the server when yous quit the Camera app and connect to Wi-Fi.
To actuate My Photograph Stream on iPhone:
- Go to Settings > Your Apple ID > iCloud > Photos
- Swipe right next to Upload to My Photo Stream
Images volition exist kept on the server for 30 days. Y'all can import new files from any device.

iCloud Photos uploads all pictures and videos on the deject and automatically synchronizes them between all devices. If you activate both iCloud Photos and My Photo Stream, the latest photos will exist duplicated in both.
Devices that support My Photo Stream:
- iPad, iPod bear on, and iPhone with iOS v.ane or afterward
- MacBook running Os 10 Panthera leo or after with the Photos app pre-installed
- Second or third-generation Apple TV Hard disk drive or Apple Tv set with Boob tube iOS five.0 or newer
- PC running Windows seven or later with iCloud
After the images have been synched, yous tin can download the photos on your device and delete them from the binder. This volition delete the images from the cloud, but the version saved on your device will remain.
Recall that the pictures in the photo stream won't exist in that location after 30 days, so if you don't want to lose them, you should relieve them on your Mac.
If y'all adopt video tutorials — cheque out our YouTube guide!
FAQ
Why won't my photos import from an iPhone to a Mac?
If you lot're struggling to transfer a photo from an iPhone to a Mac, try the following:
- If you lot're using a cable for photo transfer, check that it is properly continued and performance normally
- Install all the latest updates on all of your devices
- If yous're using a wireless connexion, check that yous're connected to Wi-Fi and have internet access
- Ensure that you utilise the same Apple tree ID on all of the devices yous're attempting to sync. On iOS devices, go to Settings and open your Apple tree ID to bank check. On MacBooks, go to the Apple carte > System Preferences > iCloud/Apple tree ID.
How to import photos from iPhone to Mac without iPhoto?
If for some reason, you want to move a photo to a MacBook without iPhoto, y'all can try transferring with AirDrop, iCloud, or verified third-political party apps.
What to do if non all photos are imported from iPhone to Mac?
If some images fail to transfer from iPhone to Mac, make sure nearly the following:
- Both devices are connected to the same Apple ID
- You take an adequate Wi-Fi connexion
- Your selected method of transfer supports the format of the files being transferred
- Your files are not damaged
How to get photos from your computer to your iOS device?
Here'south a step-past-stride guide:
- Select the photo that you desire to export in the Photos app on a Mac
- In the File card on summit of the screen, click on Export so Export N Photo, where N is the number of photos that you lot selected
- From the pop-up card, choose the format of the files that y'all want them exported in. Your options are: JPEG, TIFF, PNG
- In the Filename menu, you can change the name of the image file. For example, give information technology a numbered sequence so you can look it upward more hands
- Choose the storage location and click on Export
Read more than:
- The Best Means to Find and Delete Indistinguishable Photos on a Mac
- The Easiest Ways to Make a Photograph Slideshow on a Mac
- How to Delete Photos on a Mac
- three Ways to Convert HEIC Files to JPGs Format on a Mac
Source: https://mackeeper.com/blog/how-to-import-photos-iphone-to-mac/
Post a Comment for "Best Way to Upload Photos to Mac"